
Everyone’s environment may vary depending on the browser and operating system they are using. The steps and appearance of the notification prompt may differ slightly between browsers and operating systems.
Below is an example of what the “Allow notifications” pop-up may look like when using Windows as the operating system and Google Chrome as the browser.
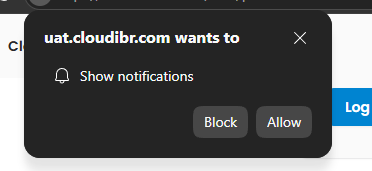
Click Allow on the pop up to allow Cloud IBR to send notifications to your browser.
If you are having trouble accessing your Notification Center or allowing notifications, please refer to the documentation for your operating system below.
Windows — Microsoft
Official Microsoft documentation:
Microsoft — Notifications and Do Not Disturb in Windows
To allow/manage notifications in Windows:
- Open Start → Settings.
- Go to System → Notifications.
- Turn Notifications on.
- Under Notifications from apps and other senders, select the application you want to configure.
- You can turn notifications on or off for the application and control options such as notification banners, sounds, and whether notifications appear in Notification Center.
To access Notification Center: Select the clock/notification area on the taskbar or press Windows + N. The Notification Center contains notifications you haven’t acted on and lets you clear or manage them.
macOS — Apple
Official Apple documentation:
Apple — Change Notifications settings on Mac
To allow/manage notifications on macOS:
- Open Apple menu → System Settings.
- Go to Notifications.
- Under Application Notifications, select the app you want to configure.
- Turn Allow notifications on or off.
- You can also configure the notification style and other options.
To access Notification Center: Click the date and time in the menu bar. Apple documents Notification Center as the place where your Mac displays and organizes notifications.
Linux — GNOME
Official GNOME documentation:
GNOME — Notifications and the notification list
To allow/manage notifications in GNOME:
- Open Activities and search for Settings.
- Open Settings.
- Select Notifications in the sidebar.
- From here, you can manage notifications and enable or disable notifications for individual applications.
To access the notification list: Click the clock in the top bar or press Super + V. You can select individual notifications, dismiss them, or use Clear List to remove the notifications.
Linux — KDE Plasma
Official KDE documentation:
KDE — System Notification Settings
To allow/manage notifications in KDE Plasma:
- Open System Settings.
- Go to Personalization → Notifications.
- KDE lets you configure notification behavior, including Do Not Disturb, notification popups, notification history, sounds, and application-specific notification settings.
- For an individual application, use the Application-specific settings section to configure how that application’s notifications are displayed.
To access the notification list: Click the Notifications icon in the system tray on the KDE Plasma panel. You can review individual notifications, dismiss notifications, or clear notifications from the list.